Configuring a D-Link Dir 825 Router
DIR-825 Basic Configuration StepsConfiguring Your Router
STEP 1 (a): Connect Your PC to the Router- Unbox the router and power up the router.
- Connect the Act internet cable to the WAN/Internet port (different colored port)of the router.
- An extra cable will be available with the router, take LAN cable connect one end to the LANport(1- 4) Of the router (any one port) and one end to the PC or Laptop.
- In the system press
 key & R key together
  to open Run dialog box.
 - Type ipconfig on the command prompt (Black screen). The default gateway of the LAN or Ethernet adapter will be the Router address. (Ex:192.168.1.1)

- Switch on the router and connect ACT internet cable to the WAN/Internet port of the router
- Go to setting in the Mobile, turn on Wi-Fi and wait until the mobile detects router name press the router name to connect.
- If the router is already configured and the Wi-Fi password is known then go to settings in the Mobile
- Under “Wireless and Networks”, press Wi-Fi make sure "Wi-Fi" is turned on.
- Wait until the mobile detects router name press the router name if prompted enter the Wi-Fi password and press Connect.
- Every Router Configuration has two parts
- – Configuring the Internet Part, where we tell the Router how to connect to the internet.
- – Configuring the Wi-Fi Part, where we decide the name and password with which we connect to the Router
- Internet Configuration shown here will guide to configure the Router in PPPoE.
- – This will enable you to browse internet directly, every time you connect to the router. No need to login again and again.
- Wi-Fi Configuration has also been given, in order to ease the process of you connecting to the Router
- – SSID and Password Creation have been explained
- – Few high end routers have two bands to work on – 2.4 GHz and 5 GHz – This router has both the Bands.
- – 2.4 GHz band provides higher range, but lesser speed.
- – 5 GHz band provides lower range, but higher speed.
- – Changing Different WI-Fi Channels – Helps in reducing Slow Speed Issues.
- Open a browser Enter the below IP Address in the Address Bar. A login page appears. The usual usernames and passwords are given in the table below.
-
Router Name IP Address Username Password Cisco or Linksys 192.168.1.1 admin admin D-Link 192.168.0.1 admin (blank) TP-Link 192.168.0.1 admin admin Net gear 192.168.1.1 admin password Belkin 192.168.2.1 Click on Login in Home (blank) Tenda 192.168.0.1 admin admin i-Ball Baton 192.168.1.1 admin admin Digisol 192.168.2.1 admin 1234 or admin Asus 192.168.1.1 admin admin If all the above credentials do not work, please check the back of the router wherethe username and password will be mentioned.
- – The username is “Admin” and no password (blank)
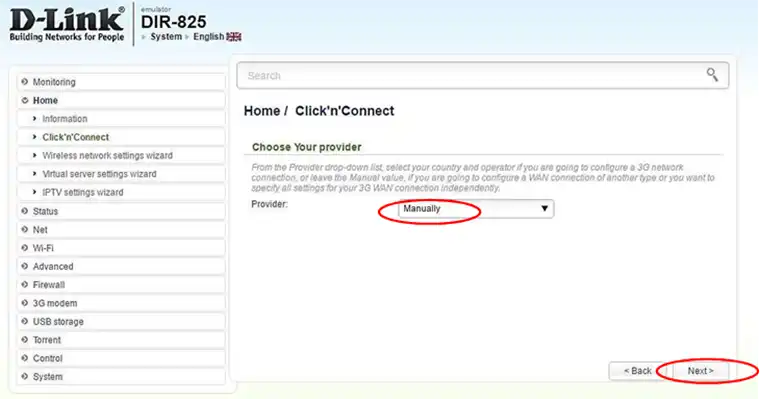
- – Choose PPPoE in the connection type > Next
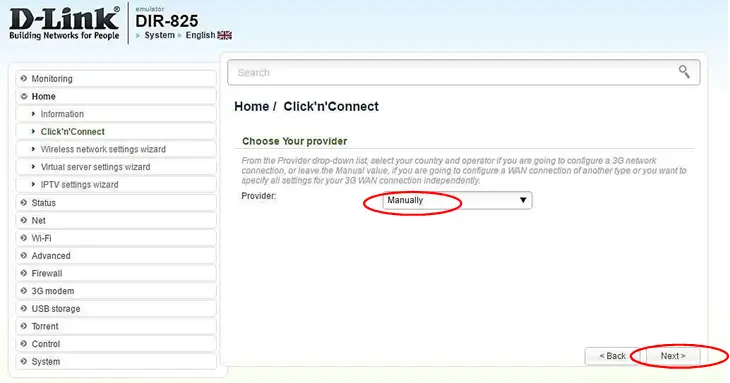
- – Home > Click’n’Connect > Manual > PPPoE > Enter the username provided by ACT > password provided by ACT > Next
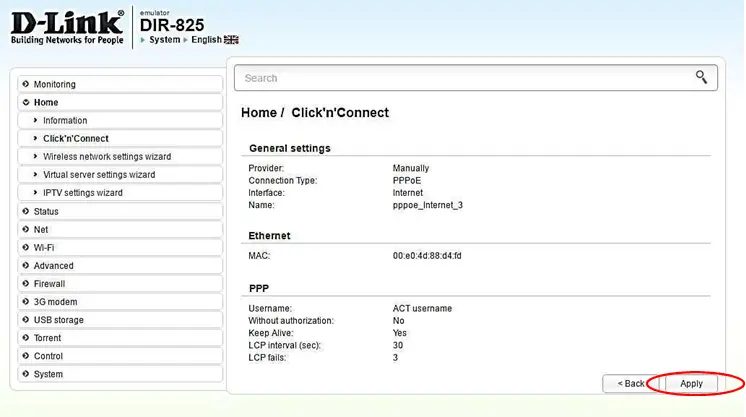
- – The PPPoE session is created > Apply
- – Under wireless network mode choose > Access point > Next
- – Provide any name to the router under SSID > Next > under security authentication > select Protected > enter any 8 character password under network key > Next
- – Under Wi-Fi > Basic settings > 2.4 GHz/5 GHz > Enter the required SSID > the required channel as per the premises > Apply You can choose appropriate channel based on premises. We have a separate slide on deciding Channel Number. Refer this slide: Step 7
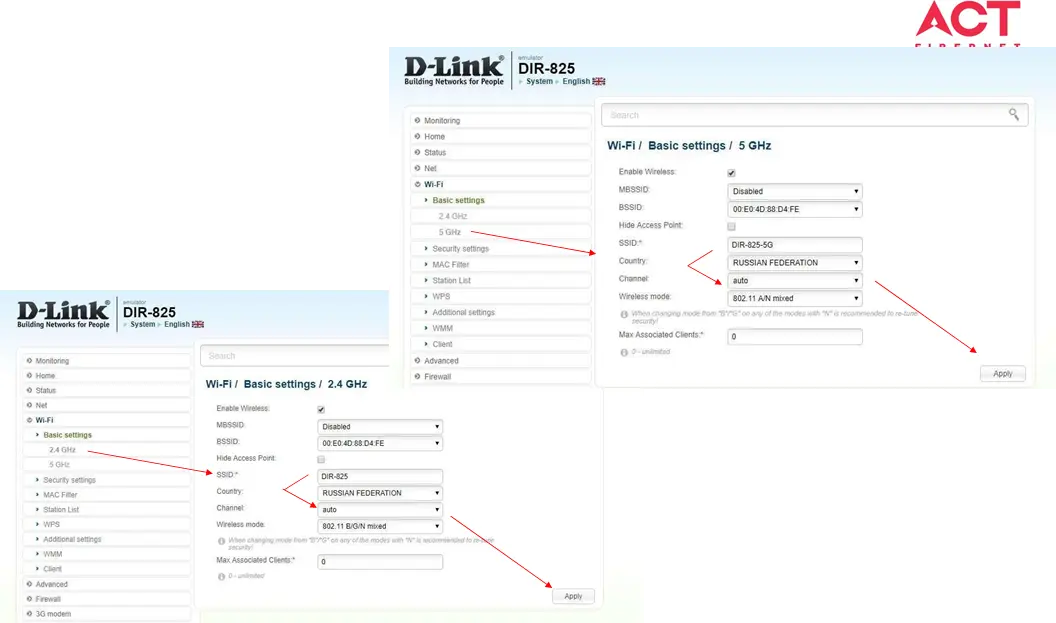
- Under Wi-Fi > Basic settings > 2.4 GHz/5 GHz > Enter the required SSID > the required channel as per the premises > Apply You can choose appropriate channel based on premises. We have a separate slide on deciding Channel Number. Refer this slide: Step 7
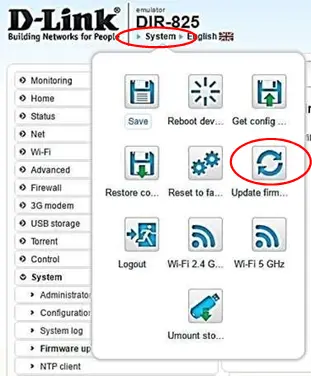
- – Save all the settings by going to System > Save
- – Under System > firmware upgrade > Select the update file from the PC which has been downloaded from the router website > Update therouter
- - You can choose to download a Firmware version and then upload it offline or choose to download directly from internet itself
- • Channels are the mediums through which your router transmits signals to other devices.
- • There are several channels that one can choose from, based on the Frequency at which your router works (Bands – 2.4 GHz or 5GHz) and the premises.
- – Step A: Download any Wi-Fi Analyzer software from Internet (It is a Freeware).
- – Step B: Choose to view different channels. We have provided an Example for better understanding.
- – Step C: Channel numbers for 2.4 GHz will be in the range of 1 to 14, whereas for 5 GHz band will be > 36.
- – Step D: Wi-Fi analyzer will show which channel is being utilized most and which one the least. Refer the example in the next slide. Choosing a channel with least utilization will give maximum advantage.
Changes to be made after Configuration
- If the Wi-Fi password is changed, we need to update the password in all the devices to get connected to the Internet.
- Changes in PC
- – Windows 7: Click on Windows button click on Control Panel click on Network and Internet click on Network and Sharing Centre.
- – In the Tasks pane(Left side of screen), click Manage wireless networks
- – Right-click the router name click Remove network click on OK.
- – Click on Network icon (right bottom corner next to system Time), click on Router name and enter the new Wi-Fi password and Connect.
- Changes in PC
- – Win 8, 8.1: Click on Network icon (right bottom corner next to system Time), Right click on Router name click on “Forget this network”. Again click on Router name, enter the new Wi-Fi password and Connect.
- – Win 10: Click on Network icon(right bottom corner next to system Time), click on Network settings under Wi-Fi click on Manage known Networks Click on your Router name and Click on Forget, and again click on Network icon click on Router name enter the new Wi-Fi password and Connect
- Mobile or Tablet
- – Go to ‘Settings’ in Mobile, turn on Wi-Fi and long press on your Router name and press “Forget network”. Again press the router name. You will be prompted to enter the Wi-Fi password. Enter the Password and Connect.


