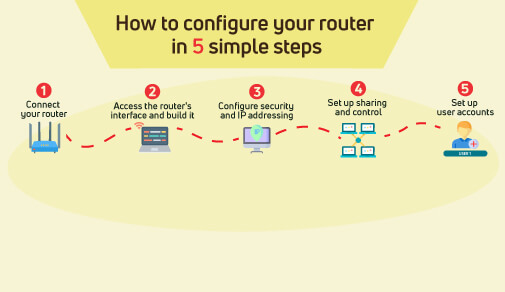
How to Configure a WiFi Router in 5 Simple Steps
Wednesday, Jul 29, 2020 · 7 minutes

The configuration process of a broadband Wi-Fi router doesn't have to be an ordeal. Although ISPs (Internet Service Providers) try their best to make it easier to install their products, manually configuring your WiFi router helps improve internet speed, network security, and overall performance. one can still burrow deeper into the router's configuration pages to establish security, access controls, and granular management.
At any rate, setting up a tightly managed, secure home network is possible by following these five steps.
These steps apply to most routers used in Indian homes, including fibre broadband connections.
The broadband Wi-Fi router is the bridge between the Internet and your home network. It is how all the devices on your network communicate with one another. The device that has to be connected to the WiFi router, has to have an appropriate network adapter. The first step to configure is to physically connect your router to a modem provided by your ISP with an Ethernet cable, by following these steps:
The next step involves accessing the router's interface in the following steps:
Most router manufacturers use the same default IP address, admin account, and passwords on all their routers. The router's documentation provided by the manufacturer will tell you the specific IP address and account login information.
After accessing the router, the next order of business is getting the security, SSID, and IP addressing settings right. These settings are found under the "Basic" settings of the interface. They may also be under "Security" or "Wireless Settings". Further steps are:
Now that you have a network set up, you can set up a way for all the devices to access data on the network. This can be done by setting up a "Home Network" by using your current location.
Further, try to set up user accounts with your WiFi router plans by adhering to the below steps:
If you face any issues while setting up the router, you can contact your ISP immediately. The internet provider will also help whenever you face any other technical issues or billing issues related to your WiFi recharge plan.
Setting up the router does not guarantee that you get a fast internet speed. Network congestion, device issues, outdated router firmware, etc. can also hinder the performance of your internet. Here are a few things that you can do after getting a WiFi recharge plan from a competent ISP:
The router must be placed at a central location so that all the devices can access the WiFi signals without any issues. Also, ensure that a wall or furniture does not obstruct the router.
Avoid keeping the router in a place where multiple electronic devices are around it. The routers are programmed to distribute the WiFi signals in a downward direction. So, it is better to keep them at a higher altitude.
As we said earlier, keeping a router close to electronic devices may affect the WiFi performance. The radio frequencies that the electronic devices emit may interfere with the WiFi signals causing a slow internet speed. To speed up your broadband connection, you must keep the router away from Bluetooth gadgets, microwaves, lights, and other electronic devices.
Nowadays, most routers are dual-band frequency routers. It means that they support both 5 GHz and 2.4 GHz frequencies. The 2.4 GHz frequency channel is for a longer range whereas the 5 GHz frequency is for a faster speed.
If you want to enjoy faster broadband speeds without any interference, you can switch to the 5 GHz router frequency. However, if you need a longer range, you must set the router to 2.4 GHz frequency.
You can set the router to 5 GHz frequency and use a WiFi extender to get faster speeds without compromising on the range. However, you will have to purchase the range extender additionally as the ISP will not provide it for free.
Irrespective of how powerful is your WiFi recharge plan, if you connect too many devices with WiFi, the internet is bound to slow down. So, you must connect limited devices with the WiFi, especially when you indulge in data-intensive tasks such as watching an HD movie, streaming live channels, playing high-end games, etc. If you are into gaming, use a broadband connection that offers consistent speeds and bandwidth.
Set up a strong WiFi password, so that no one can trace it and use your WiFi without your permission. Also, never share your WiFi password with your neighbours as they might steal your WiFi signals without your knowledge. Change your WiFi password regularly to avoid such instances.
Ensure that your router uses the latest WiFi technology to enjoy the best experience after subscribing to a WiFi recharge plan. You may have to upgrade your router firmware regularly or get a brand new router every year to get consistent speeds and reliable performance from your broadband connection.
Read more tips and tricks to increase your wifi speed here.
These were some tips and tricks to get the best internet performance after subscribing to a WiFi recharge plan. To get uninterrupted internet, switch to an ISP that offers the best services in your area.
ACT Fibernet offers fibre-optic internet in 22 cities across India. Their reliable services and top-notch internet performance make them one of the best ISPs in the country. Along with a free router and no installation charges, they provide various add-on services with their WiFi recharge plan.
You can also switch to a new plan easily by using their mobile app. Visit their official website today and explore the WiFi recharge plan that suits your internet requirements perfectly!

Lead has been submitted successfully.
![]() Please wait while we redirect you
Please wait while we redirect you
![]() One of our representatives will reach out to you shortly
One of our representatives will reach out to you shortly
One of our representatives will reach out to your shortly
![]() Please wait while we redirect you
Please wait while we redirect you

Please enter your registered phone number to proceed
Please enter correct OTP to proceed

Dear customer you are successfully subscribed
Please wait while we redirect you
Your ACT Shield subscription has been successfully deactivated
Dear user, Your account doesn't have an active subscription
Dear customer Entertainment pack is already activated.
Please wait while we redirect you