Account number is a unique number assigned for your ACT Fibernet billing account. You will find this on the top right corner of your statement of account.
- You can check your account number on your statement of account. Click here to login to your account.
- Go to https://selfcare.actcorp.in/web/blr/home
- Click "Forgot Password".
- Enter your username and your registered mobile number.
- The password will be sent to your registered mobile number and email address.
- Go to https://selfcare.actcorp.in/group/blr/myaccount.
- Click "Change password"
- Fill in the relevant information and click on "submit".
- This action will change your password immediately.
Please note:
1. Changing your login password will require you to reconfigure the password setting on the router to enable a login.
2. Click here to know the router configuration process.
3. It is recommended that you change your password the first time you log in, and also keep changing it periodically for better security of your account.
- Go to https://selfcare.actcorp.in/web/blr/home
- Enter your username and password and click to log in.
- Once you are logged in, you can carry on surfing as you would normally do. Once you are finished with your internet usage, you can log out on https://selfcare.actcorp.in.
Please note:
Even if you do not log out manually, your account will get logged out automatically in some time on account of no usage. This is for the security of your account. We suggest you always log out once you have finished your browsing session.
- Connect the ACT cable to the input jack on the Wi-Fi router.
- You are required to configure the router as per the specifications of the make and model. Use this link to configure your router.
- Your ACT user id and password will be have to be saved on the router configuration page.
- Also, you will need to also give a router identifier name (SSID) and a router login password (SSID Pwd).
Our network runs on world class equipment from various Global Telecom Giants. The de-facto global standard today is the Portal Based Web Login Mechanism. This is the New Global Standard and we are amongst the first to offer this in India. This service runs on highly secure and reliable Ericsson equipment and a few of the advantages are listed below:
- Portal Based Login helps you to better manage your account. Your data usage, package info etc. is visible to you every time you login, which helps you to control your costs better.
- Portal Based Login, provides a more secure connection between your computer and our Network Centre.
- By Logging in every time you use the service, you ensure that there is no misuse of your connection, which can easily happen in case of "always on internet connections" provided by other service providers.
- Web Self Care option available to you on the portal, allows you to manage your services, view your invoices, make payments through a payment gateways, update your personal contact info, register service requests, etc.
For a seamless internet experience, it is recommended that you upgrade your operating system immediately. Please ensure:
- Windows XP is upgraded to Latest Service Pack (available through Windows Update or on www.microsoft.com).
- Windows Vista is upgraded to Latest Service Pack (available through Windows Update or on www.microsoft.com).
- Antivirus security to be reduced from 'high' to 'medium' so that Genuine Network Traffic does not get blocked.
- The power save mode of your laptop is not configured to "disable" or "disconnect the LAN card while working on battery."
- Use only original operating system software.
If the problem still persists, please check the following:
- The operating software (Windows XP or Vista or Windows 8, 8.1 or 10) is not corrupted.
- RPC services on the Windows XP, Vista, 8, 8.1 or 10 are not corrupted.
For more details click on this link.
Please note:
This FAQ is a consumer interest advisory issued by ACT TV System. We are not responsible for failure in internet services on account of hardware/software failures in customer computers, and we do not offer system support. We suggest that you consult your AMC provider/computer vendor in case of any queries).
Small change in spelling of your name as it appears on the account: This can be requested for through an email to our helpdesk team with an ID proof document showing the intended spelling.
Complete change of name to another person: This is classified as transfer of ownership and will require us to process the request as a completely new connection. Your existing connection will be disconnected and a new account will be created in the new name. The process will also mean transfer of existing balance/dues in the older account to the new account.
Process for individual connection:
- Visit the nearest branch to complete the formalities.
- Physical presence of the Transferee is required (i.e. the new customer).
- New connection application will be created & proof of Address/POI and ecaf is created.
- Customer to share no objection from Transferor & transferee to accept ownership for clearing outstanding if any.
- Please note that before creation of new account the existing account will get disconnected. (Transition period will be approx. 24 Hrs.)
Company to Company or Individual to Company
- Visit the nearest branch to complete the formalities.
- Physical presence of the Transferee is required (i.e. the new customer).
- New connection application will be created & proof of Address/POI and ecaf is created.
- Customer to share no objection from Company and accept liability for clearing outstanding payment if any.
- Please do note that before creation of new account the existing account will get disconnected. (Transition period will be approx. 24 Hrs.)
| Individual Customer | Commercial Connection | ||
| for ID Proof | for Address Proof | for ID Proof | for Address Proof in Company name only |
| Pan card | Aadhar Card | Pan card | BSNL Bill Latest |
| DL | DL | DL | Rental/ Lease agreement |
| Passport | Passport | Passport | Sale Deed / Khata Certificate |
| Voter ID | Voter ID | Voter ID | Airtel Broadband bill |
| Aadhar Card | BSNL Bill Latest | Aadhar Card | Bank statement within three months |
| Rental/ Lease agreement | Company Pan card | Electric city bill | |
| Sale Deed / Khata Certificate | BWSSB bill | ||
| Gas bill with three months | TAX bill | ||
| Airtel Broadband bill | Incorporation Certificate | ||
| Bank statement within three months | GST Certificate | ||
| Electric city bill | Partnership Deed | ||
| BWSSB bill | List of Directors (MOM - Memorandum Of Association) | ||
| TAX bill | |||
To configure the network setting on PC (WINDOWS XP)
- From the "Start" menu, select "Settings".
- Click on "Network and Dial up Settings"
- Right-click on the "Local Area Connection" Icon and then click "Properties."
- In the General tab, select "Internet Protocol (TCP/IP)", and then click "Properties."
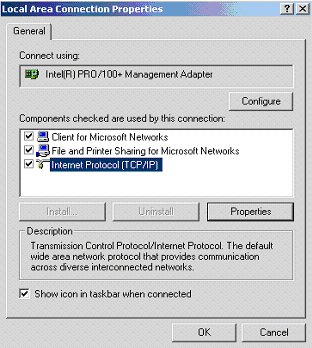
- Under General tab, select the "Obtain an IP address automatically" and "Obtain DNS Server address automatically" options as shown in the screen given below.
- Press OK to save and exit. This completes the setting and you are ready to access the internet.
To configure the network setting on PC (WINDOWS Vista)
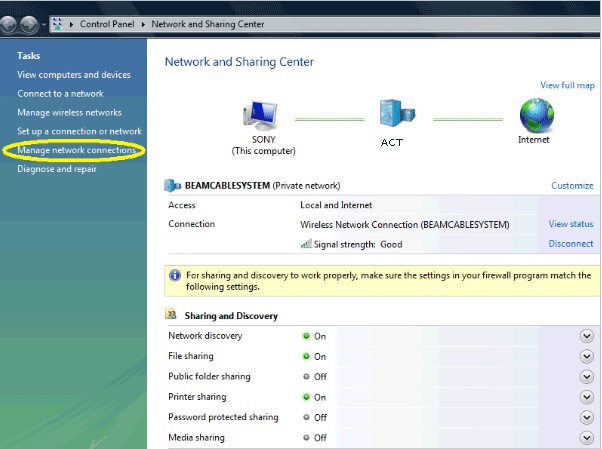
- Go to Control Panel and Click on Network and Sharing Centre and click on "Manage network connections"
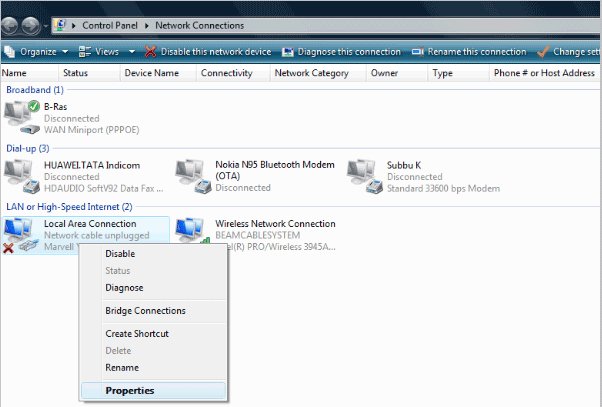
- Then right click on "Local Area Connection" and select "Properties"
- In the General tab, select "Internet Protocol (TCP/IP)", and then click "Properties."
- Under General tab, select the "Obtain an IP address automatically" and "Obtain DNS Server address automatically" options as shown in the screen given below.
- Press OK to save and exit. This completes the setting and you are ready to access the internet.
Windows 8.1
Steps to configure internet in Windows 8.1
1. Summon the Charms bar and click the Settings icon.
- Press Windows + I to head straight for the Charms bar’s Settings pane. Mouse owners can point at the screen’s top- or bottom-right edge; when the Charms bar appears, click the Settings icon
- If you’re a touchscreen user, slide your finger inward from the screen’s right edge; when the Charms bar appears, tap the Settings icon.
2. Click the network icon near the bottom of the Settings pane.
The network icon changes shape depending on your surroundings and connection method
- Available (wireless): When the icon says Available, you’re within range of your wireless network. Start salivating and move to Step 3.
- Unavailable (wireless): When the icon says Unavailable, you’re out of range of a wireless network. Move closer to your router until the icon says Available.
- Connected (wired): This icon means the cable is correctly connected between the router and the computer.
- Unavailable (wired): The cable isn’t connected correctly, or the router hasn’t had time to detect the connected computer.
If you’ve connected a wired network, and the icon shows Available, your network is up and running. If it’s listed as Unavailable, turn off your router, modem, and computer. Then turn on your modem, router, and computer, in that order, waiting a minute before turning on the next one.
3. Click the Wireless Available icon.
4. Choose the desired wireless network by clicking its name and then clicking the Connect button.
If you select the adjacent Connect Automatically check box before clicking the Connect button, Windows automatically connects to that network the next time you’re within range, sparing you from following all these steps again
5. Enter a password
Here’s where you type in the same password you entered into your router when setting up your wireless network.
Or, if your router model allows it, you can press a button on the router to bypass the password and connect immediately.
6. Choose whether you want to share your files with other people on the network.
7. Because you’re connecting at home and not in a public place, select the option labeled Yes, Turn on Sharing and connect to devices.
While you’re working on the Windows 8 desktop, the taskbar’s wireless network icon provides a handy way to connect wirelessly, as well. If your desktop’s taskbar contains a wireless network icon, click it to jump to Step 3
Steps to configure internet in Windows 10
1. Click the Start icon (or press the Start button on the keyboard), and then tap or click Settings.
2. Click Network & Internet
3. Click Ethernet
4. Click Change Adapter Options
5. Right-click the connection that you want to configure and then choose Properties from the contextual menu that appears
6. To configure the network adapter card settings, click Configure
7. Review the list of connection items listed in the Properties dialog box
8. If a protocol that you need isn’t listed, click the Install button to add the needed protocol
9. To remove a network item that you don’t need (such as File and Printer Sharing for Microsoft Networks), select the item, and click the Uninstall button
10. To configure TCP/IP settings, click Internet Protocol (TCP/IP); click Properties to display the TCP/IP Properties dialog box; adjust the settings; and then click OK
Steps to configure internet settings in mac OS
1. Using your internal modem
Follow these steps to set up your Internet connection if you’re using your Mac’s internal modem:
1. Click the System Preferences icon on the Dock and choose Network.
2. Select Internal Modem from the Show drop-down list.
3. Click the TCP/IP tab (as shown in Figure 1) and enter the settings for the type of connection that your ISP provides
- If your ISP tells you to use PPP (Point-to-Point Protocol): Click the Configure IPv4 drop-down list and choose Using PPP. If your ISP provided you with DNS Server or Search Domain addresses, type them now in the corresponding boxes.
- If you’re using AOL: Click the Configure IPv4 drop-down list and choose AOL Dialup. If AOL provided you with DNS Server or Search Domain addresses, click in the corresponding box and type them now.
- If you’re using a manual connection: Click the Configure IPv4 drop-down list box and choose manually. Then click in the IP Address, DNS Servers, and Search Domains fields and enter the respective settings provided by your ISP
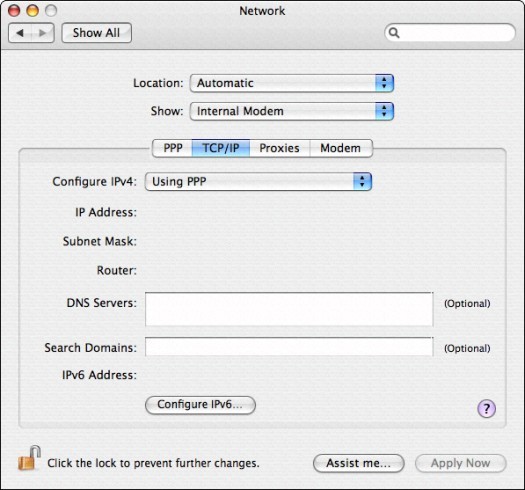
Figure 1: The Network settings for an internal modem internet connection
4. Click the PPP tab to display the settings shown in Figure 2
5. In their respective fields, enter the account name, password, telephone number, and (optionally) the service provider name and an alternate telephone number provided by your ISP
6. Press COMMAND+Q to exit System Preferences and save your changes
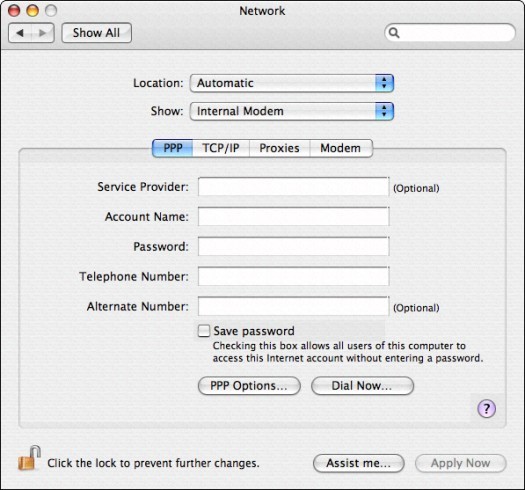
Figure 2: Adding PPP settings
Steps to configure internet settings in mac OS
2. Using Ethernet hardware
Follow these steps to set up your Internet connection if you’re using a network, cable modem, or DSL connection:
1. Click the System Preferences icon on the Dock and choose Network
2. Select Built-in Ethernet from the Show drop-down list to display the settings that you see in Figure 3
3. Enter the settings for the type of connection that your ISP provides:
- If your ISP tells you to use Dynamic Host Configuration Protocol (DHCP): Select using DHCP from the Configure IPv4 drop-down list, and your ISP can automatically set up virtually all the TCP/IP settings for you
- If you won’t be using DHCP, select manually from the Configure IPv4 drop-down list box.
Then enter the settings provided by your ISP in the IP Address, Subnet Mask, Router, and DNS Servers fields.
4. If your ISP uses PPPoE (Point-to-Point Protocol over Ethernet), click the PPPoE tab to display the settings shown in Figure 4.
5. Mark the Connect Using PPPoE check box to enable it and then enter the account name and password.
If your ISP includes the Service Provider name and a PPPoE Service name. You can enter those as well.
6. To allow everyone who uses your Mac to access the Internet with this account, mark the Save Password check box to enable it.
Press COMMAND+Q to exit System Preferences and save your changes
Figure 3: The network settings for an Ethernet Internet connection
- Log in to post comments


